 You may have heard of the term, “side chain” or “sidechain” in audio recording. As with so many things in the audio recording realm, the term sounds more complex than what it actually means.
So what DOES “sidechain” mean already?
Okay, let’s start with a basic description of how an effect (think compression or EQ) is applied to an audio track.
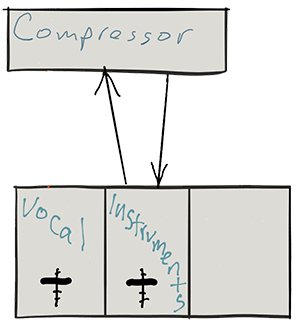
Let’s say you want a compressor (see my post “Should You Use Compression In Audio Recording?“) on your musical instrument track. You would connect the compressor by sending the music on a round trip from the music track to the compressor. When the music comes back FROM the compressor, it is now compressed. See pic below.
How a compressor knows what to do
A compressor only applies its effect when it is told to by the incoming audio. For a review on this see my post Vocal Compression Using Reaper’s ReaComp Effect Plugin. For example, it will compress only if and when the incoming audio gets louder than a certain “threshold” volume. At all other times, the compressor does nothing.
Now usually the sending and receiving signals are from the same track – instruments from the instrument track go into the compressor and compressed instruments go back to the instrument track.
But what if you fed the compressor a DIFFERENT input?
Say you could get the compressor to compress the vocal track based on instructions from a track that is NOT the vocal? whoa, that’s some mad scientist stuff right there! But maybe you could do some cool things.
Let’s say you have music on a second track. What if you sent THAT audio into the compressor to control how the voice is compressed? Well. that is exactly what happens when you “duck” an audio signal. When the voice is singing/talking, it pushes the music out of the way. You guessed it. I have a post on ducking too:) – What is Ducking In Audio Recording?
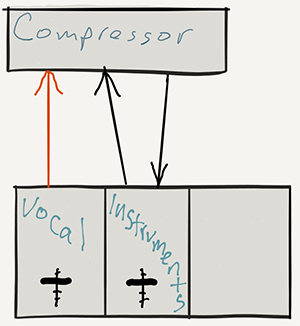
You still have the instrument track sending the music on a round-trip to the compressor. But the compressor no longer takes orders from the instruments. It listens to a new master whose input comes in a side door:). Hence the moniker “side chain.”
That side door is where you send the signal from the vocal track. So the instruments still get compressed (turned down when the control signal gets loud enough), but it’s now the vocal volume acting as the control. So when the vocal goes above the threshold, the compressor turns the volume down on the instruments. Pretty cool huh?
Other cool things you can do with side-chaining
- Make a tempo-based tremolo by sending the side chain of a gate effect a click track so the gate on an instrument track opens and closes in time with the click track
- Make pumping dance tracks by putting a compressor on to the bass and sidechain the kick, so the kick will push through the bass every hit
- Put a compressor on the bass track and then have the kick drum activate the compressor via a sidechain. When the kick drum hits it will dip the bass line in the mix, allowing the kick to cut through the mix and sound more clear
- Anything your imagination can come up with
Hopefully this gives you an idea what sidechain (side-chain, or however you spell it) in audio recording means.


 Why sound editing software can be your friend. One common problem with recording the human voice is sssssomething called ssssssibilance. If you didn’t already know what “sibilance” meant, my odd spelling above may have clued you in. It’s a sharp, biting hissing sound that happens whenever the recorded voice utters the “S” sound. You’ll be listening to the recording, and everything will sound great, until the speaker/singer utters the phrase “she’s a sensation,” and pierces your eardrums.
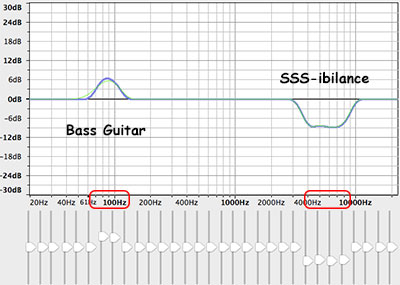 If we know, for example, that the “bass-y, boom- y parts of a bass guitar will most often be found around 80-100 Hz. So we can then we use an EQ to turn down (or up….but usually down….never mind) the bass by ONLY turning the volume down around 80-100 Hz. Likewise, high sounds like the sizzle of a high-hat, can be found hanging out around 6,000 Hz (or 6KHz for short). So if you knew that vocal sibilance mostly hung out between 4 KHz and 10 KHz, you would know where to start looking for your particular brand of hissiness so you could fix it.
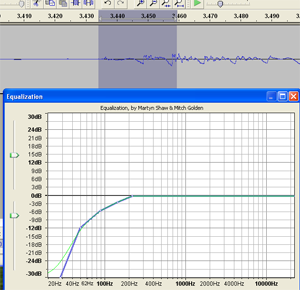
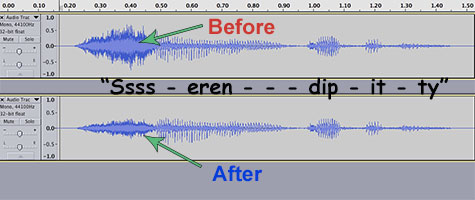 It’s so cool that we can use our eyes to edit audio now. Isn’t it? Sigh, OK I’m a geek. Anyway, you can usually see sibilance on a computer screen pretty easily, using any sound editing software available. The squiggly blobs get all bunched up and dark for a bit. In the picture, you can see the word “serendipity’ recorded. The blue blob at the beginning.

 If you have ever been asked to record and edit a conversation between two people, say, for a voice over job, then you are probably aware of the logistical problems this can cause. The client usually has visions of just getting the two people together around a microphone and simply reading their parts at the appropriate time. Sure, that would be OK if you always had both people available at the same time, along with two great microphones, a large enough space for both people to occupy at the same time, etc. But these conditions are not always available to us.
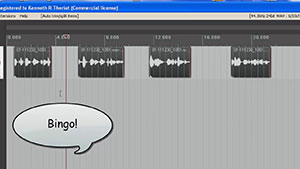 By the way, we’ll be using the excellent audio recording software called
  The next bit of time-saving automation was the Auto Trim/Split function. What this does is allow you to slice one continuous audio file into several separate audio items in a track based on when there is silence and when there is speaking going on. This was huge! I had been slicing (using the “S” keyboard shortcut) just before and just after each phrase, and then dragging the edges of the resulting clipped audio item in to get rid of the silence. That was 4 different operations (2 slices and 2 drags) for every phrase! Multiply that by dozens of phrases for each voice and you have a LOT of work. But with Auto Trim/Split, you select the entire long audio item in the track and hit one keyboard shortcut (you can set your own – mine is “ctrl+~”) and boom! Every phrase becomes its own item, perfectly trimmed on either side. See the picture at the top of the article where this has been done to each voice). That one discovery saved me about 20 minutes per voice!
 The other thing that was taking a long time was spacing each voice, alternating boy-girl-boy-girl, with exactly 3 seconds between each phrase. As I mentioned earlier I was doing this manually until I discovered the Reposition Items tool in Reaper. [Update: Reposition Selected Items (as it is now called) is not part of the native Reaper set of tools. You need the free extension set – SWS extensions – by just going here:
  There are two academy awards for audio recording and producing, which are Sounds Editing and Sound Mixing. The 2017 awards were awarded as follows: