 Recently, over at the Audio Daily Blog, the voice-over audio production blog at Voices.com, there was a post with suggestions about how to remove breaths from voice recordings. I figured I’d add my primary method for doing this to their list of 6 tips.
I typically record all my audio into Reaper, an outstanding multi-track recording program that rivals Pro Tools for a fraction of the cost. With music, and with move complex voice-over projects, I’ll do all my mixing in Reaper.
For voice-over jobs that require multiple parts – say a conversation between two or more people or a series of phrases that need exactly 3 seconds between them (I have done a lot of both types of jobs), Reaper is the tool I use to get everything in the right order and sounding good.
The Audio Editing Program
But after I create a single file by mixing it all down in Reaper (“rendering”), I open that single file in a different program – an audio editor – to do the final polish. Some folks consider this overkill, since so much can be done from within Reaper. But coming from a music recording background, I’m used to mastering my mixed-down/rendered audio. And to do that I use a separate audio recording software type called and audio editor. In my case, I use Adobe Audition. But there are much more affordable editors out there. I show you how to do this in Audacity (free) below, for example.
Adobe Audition
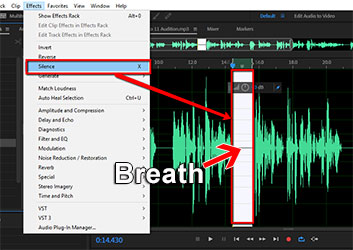
So once I open the rendered, “almost-finished” audio in my editor, I put the headphones on so I can hear every little breath, click, pop, etc. My primary tool within Adobe Audition for this is called the “Silence” tool (Effects > Silence). This tool removes all audio in a selected area, which is different from “deleting it!” If you delete the audio, you also delete that section of time. Silencing leaves the time alone, simply making it audio-free time.go through the audio, selecting breaths, and then silencing them with that silence tool.
Anyway, I actually silence all the sections between phrases to get rid of extraneous little noises that become audible when there is no vocal, including lots of the breaths. It works really well, and its fast.
Audacity
You can do the same thing in the free (but incredibly powerful) editing software, Audacity. The process is very similar. highlight just the breath sound between phrases and then locate the “Silence Audio Selection” button on the Audacity tool bar. See pic below.
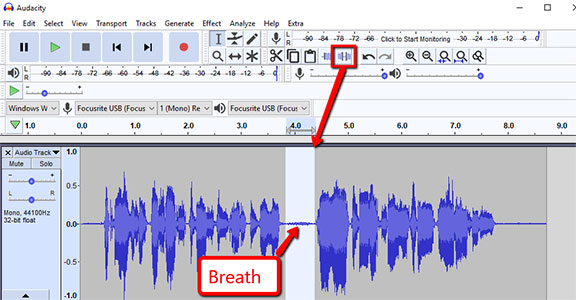
I love that there is a quick, visible button to use for this in Audacity. Adobe Audition (since moving to Creative Cloud) removed the quick button thing, which used to be there in the desktop versions. So you have to use the menu drop-down. That actually makes it easier to do in Audacity! Anyway, once you remove the breath using the button, you can just “Repeat Last Command” (CTRL-R) for the next breath and the next, instead of having to click the button every time, if you think it’s faster.
True Things No Matter What Editing Software You Use
Heed this warning though. A lot of breaths are just part of the way we speak, especially the breaths before a phrase (both my wife and I tend to put a little exhale or quick intake of breath sound at the end of our phrases. Most of these get silenced out. But many of the breaths that come before a phrase get left in, since people are used to hearing people breathe before they talk.
One more warning – if you silence most of the space between phrases, the start of a pre-phrase breath may be cut off. THAT will make the breath sound unnatural. You can fix that problem either by making sure the section you select for silencing does not include the start of the breath. Or you can use the “fade-in” tool if the start of a breath gets cut off. Creating a fade-in makes it sound natural again.
I hope this helps you get much better-sounding voice recordings!
By the way, the Audio Daily Blog post I referred to at the beginning of this article is here: http://blogs.voices.com/audiodaily/2013/05/6_tips_for_removing_breaths.html


 So what exactly does it mean to “crossfade audio”? Well before we talk about crossfading, we should probably first talk about just plain old regular fading. What is a fade?


 I’ll explain how to do it in
  Next find the I/O (stands for “in/out”) button on the vocal track. See picture on the left. You’re going to click and drag that down to the I/O button on track 2. An I/O window will open with lots of scary-looking stuff on it. Leave everything the way it is except at the bottom where it says “1/2 => 1/2”. Just click the drop-down arrow next to the second “1/2” and change it to “3/4”. See the picture on the right.
 You have just set it up so that track 1 will send a signal to track 2. The next thing you need to do is click on the FX button in track 2 to open your compressor control. Now it’s time to tell the compressor NOT to listen to the music track for cues as to when to engage, but instead, listen to the voice on track 1. So in the compressor control window (see picture below and to the left). Find where it says “Detector Input” and use the drop-down arrow to change this from the default “Main Input L+R” to “Auxiliary Input L+R“. Now the compressor will change the volume settings of the music based on the fluctuations of the voice track. Pretty neat huh?
 Now all you need to do adjust the compressor settings. You can experiment here by listening as you adjust. Start out with a Ratio setting between 4:1 and 6:1 and put the Threshold slider down to about -20 dB. One thing to be sure of before you do any of this is that the overall volume on the music track is already set to where you could hear the voice over it fairly well even without the ducking compressor. If the average volume of the music is so loud that the voice can’t even be heard to start with, ducking won’t help you much.