 For the past 3 weeks, we’ve been posting videos and articles that show you how to dramatically improve the quality of the audio you record in your home studio – especially voice recordings.
In week 1, we learned the fastest and cheapest, yet hugely effective tip of simply getting your mouth closer to the mic. Most folks record with the mic 18 inches away from their lips. But getting up close and personal at about 3 inches makes a LOT of difference.
http://homebrewaudio.wistia.com/medias/64mk4qe4vq?embedType=seo&videoWidth=640
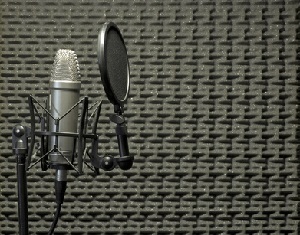
Last week we talked about how important it is – if you are recording in a converted bedroom with no acoustic treatment (this describes a vast majority of us) – to use a cardioid mic, or the cardioid setting on a multi-pattern mic. This week’s tip is another, just like the previous ones, that will not require you to build or buy anything.
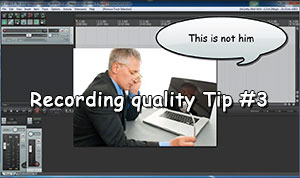
Record As Loud As Possible Without Distorting
Whether you’re recording through an audio interface, a USB microphone, or a PC mic plugged directly into your computer’s built-in sound card, you will be able to control the level of the incoming audio. With PC mics and USB mics that have no volume control knob (some USB mics, such as the Blue Yeti, do have a control on the side), you can use your computer’s operating system to control the recording level. The video above shows you how to do this in Windows. The process is similar with a Mac. Just about all audio interface hardware units have some sort of input level control.
So as you’ll see (and hear) in the video, if you record with too low a level (usually you’ll see tiny wave forms if this happens), you’ll want to “turn it up.” But doing that ALSO turns up the ambient noise. Record too loud though, and you’ll distort, which is really nasty-sounding. The trick is to find a sweet spot where you record JUST loud enough that your loudest bit of audio is just barely below the point where distortion would happen. When you record at this correct level, you won’t have much of a need, if any, to turn it up. So you keep the noise to a minimum. Check out the video for examples of all the scenarios.
Make sure you don’t miss any of the tips in this series. Put your email into the form below and get not only the rest of this series as it rolls out, but also the first 8 videos in our tutorial course “The Newbies Guide To Audio Recording Awesomeness 1: The Basics With Audacity.” This course shows you how to set up and start using your home recording studio for a budget of about five bucks (or less) in about 30 minutes.
We will not spam you with e-mails! We typically don’t send more than one message per week, and each of those will only be intended to help you make better audio recordings in your home studio.

 I just read an article offering tips on how to record good audio if you are stuck doing it in a poor room. My definition of a poor room is a rectangular room, usually a converted bedroom in your house. By definition a rectangular is poor because the way sound bounces around in one of those, you tend to get dead zones where certain frequencies are cancelled out, and other areas where certain frequencies get artificially boosted. Those things make it worse for listening (important for mixing and mastering) than for recording, really. Probably the worst thing for recording is to have bare walls, ceiling and floors that are parallel, which make for lots of echos and reverb (yeah, technically the same thing – shh!), which you don’t want in your recordings.
 Do you record vocals in a bedroom? Most folks who record in a home recording studio do so in a converted bedroom (or maybe not even converted – if you sleep in there too, I mean). Bedrooms are notoriously rectangular. I know, that’s a profound observation , right? Well, the reason I point it out is that rectangles (and a square is a rectangle too, which you should remember from your math classes) have opposite sides that are equal and parallel. That means sound will bounce around in a very predictable and interfering way, creating multiples and even nulls at certain frequencies. In English, this means that what you hear in rooms like this will NOT be a good representation of the REAL sound. Certain frequencies will be hyped and others will be barely audible or even missing entirely (wave mechanics is pretty interesting and very applicable to audio – I’m talking about destructive and constructive interference here, btw).